Did you know that you can start an entirely new African violet plant from just a leaf cutting? That’s right–with a little patience and care, you can propagate these lovely plants and watch them grow into an entirely new plant that is nearly identical to their “parent” plant!
How African Violets Reproduce
African violets have a fascinating method of reproduction that sets them apart from many other plants. Unlike many flowers that rely on seeds for propagation, African violets can reproduce a couple of different ways.
First, when an African violet is healthy and thriving, the plant will usually produce what is called “pups,” or tiny secondary plants that are attached to the main plant. These can be separated into their own plant, and will grow more leaves and flowers as it matures.
The most common way these plants reproduce, though, is through leaf cuttings. You can start an entirely new plant by simply taking a healthy leaf from the parent plant and encouraging it to grow roots. Once it matures, it will look relatively the same as the plant you took the leaf cutting from.
Reasons to Grow African Violets From Leaf Cuttings
Propagating African violets from leaf cuttings allows you to create new plants without having to purchase expensive seeds or established specimens. This means that you can easily multiply your collection without breaking the bank.
Moreover, growing African violets from leaves gives you the opportunity to experiment and develop unique varieties. By selecting specific parent plants with desirable traits, such as vibrant colors or unusual foliage patterns, you can create your own customized hybrids.
Another benefit of starting African violets from leaf cuttings is that it’s relatively simple and accessible for beginners. You don’t need advanced gardening skills or specialized equipment; all you require is a healthy leaf cutting, a suitable potting mix, and a little patience.
In addition, this propagation method allows for greater control over the growth process. You can closely monitor each stage of development, ensuring optimal conditions for root formation and overall plant health.
With so many advantages at hand, why not give it a try? Start growing your very own African violet collection today using leaf cuttings—a rewarding journey awaits!
Preparing to Start an African Violet From a Leaf
Before you dive into propagating your African violet, it’s important to gather everything you need. The only tools you’ll really need are pruning shears, a small pot with fresh African violet potting mix, and some water. Your pruning shears will need to be sanitized, so take care of that before you begin, also. Fill your new pot with the potting mix and make sure it is moist, not soggy. You may also want some rooting hormone to help encourage fast root growth, but it’s okay to skip this when the time comes.
Once you are ready to begin, closely inspect your plant to find a couple of the healthiest leaves. If the overall plant is in great health, then your chances of successfully propagating it are much higher. A sick plant will likely not propagate successfully.
How to Start an African Violet From a Leaf
Now that you have what you need to propagate your plant, let’s get started!
Step 1: Remove the Leaf
Using your clean and sanitized pruning shears, cut off the leaf you have identified as one of the healthier ones. You can cut off a few if you’re wanting more than one new plant. Don’t forget, the healthier the leaf, the better your chances of a successful propagation!
Step 2: Trim the Leaf Cutting
Use your pruning shears to trim off any damaged or discolored parts of the leaf. This will help prevent any potential issues during rooting. Then, cut the stem of the leaf to just under and inch long. This cut should be at a 45 degree angle to help promote the best root system.
Some professional African violet growers say that you should cut off the top quarter of the leaf itself, but your leaf will root either way, so I leave the leaf the way it is.
Step 3: Rooting the Leaf
Dip the end of your stem in rooting hormone if you are using it, and then insert the stem end of your leaf cutting into the soil, burying about half an inch deep. From here, you only need to keep the soil moist, and ensure the cutting is in a relatively humid environment.
There’s a fine balance here that could be the difference between a successful propagation and a rotted leaf, so keep a close eye on your cutting to keep it healthy, adjusting humidity and watering levels as needed.
Step 4: Protect Your Cutting
Cover your container with a clear bottle, cup, or plastic wrap to create a mini greenhouse effect that traps humidity around your cutting. This can sometimes maintain the perfect humidity levels to promote root growth, but you still need to keep a close eye on it because it could also suffocate your delicate leaf that is trying to grow new roots. If you choose to use plastic wrap, make sure that the plastic wrap does not touch the foliage. This creates a spot where moisture could build up on the leaf and rot it before it has a chance to root.
Step 5: Transplant
After 6-8 weeks you should see signs of new growth! It may take longer to see growth above the soil, but if you very gently tug on the leaf, and it doesn’t budge very easily, then your beautiful leaf has grown roots! Once you see some new leaves above the soil and they are somewhat well-established, you can carefully transplant your newly propagated plant into a bigger pot if needed. If you propagated multiple leaves in one pot, this would be the time to separate them into their own pots.

Propagating African Violet Leaves in Water
Another method for starting an African violet from a leaf cutting is to propagate the leaves in water. This approach can be particularly beneficial for those who are new to propagating plants or have struggled with other methods.
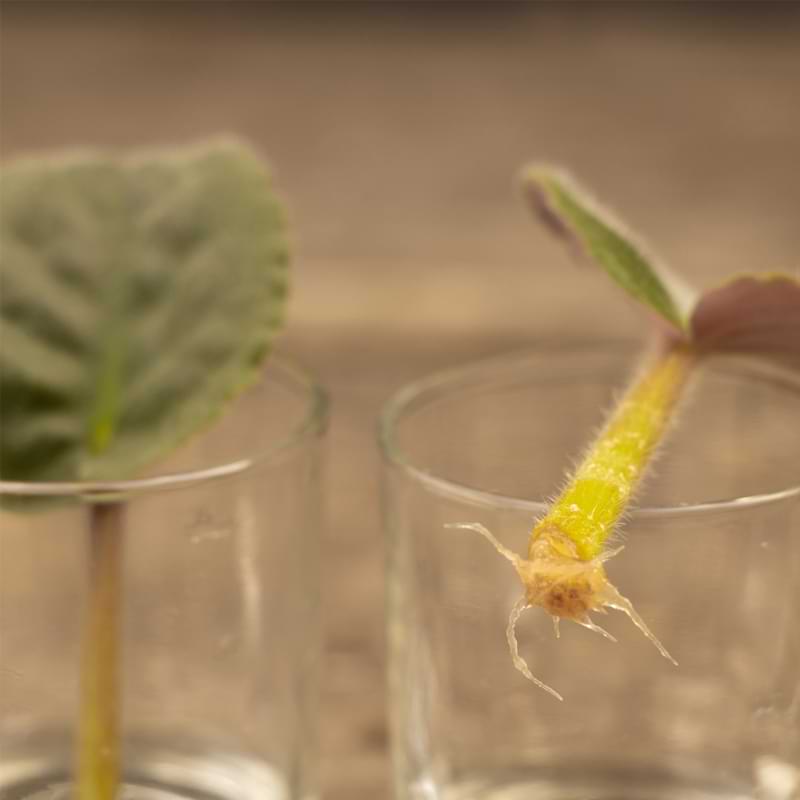
You’ll begin this process in much the same way you would if propagating in soil. First, select a healthy leaf from your African violet plant. Gently remove it from the stem, ensuring you have about an inch of stem on the leaf still. Fill a small glass or jar with filtered water and place the leaf cutting in it, making sure that only the stem is submerged.
The easiest way to keep only the stem in the water is by first putting plastic wrap around the top of the glass jar, and then poking a hole in it that only the stem can go through. This creates a “seat” for the leaf to sit on while the stem is submerged in water, waiting for roots to grow.
Keep the glass or jar in a location where it will receive bright but indirect light. Avoid placing it near drafty areas or direct sunlight as this may harm your cutting, and change out the water every few days to prevent stagnation and ensure proper hydration.Over time, you should start seeing roots appearing at the base of your leaf cutting. Once these roots have grown to about an inch long, carefully transfer your cutting into African violet potting soil, burying just enough of the stem so that it stands upright on its own. Continue caring for your new plant as you would any other African violet.
Join the African Violet Club!
Whether you’re just starting out or are a seasoned grower, African Violet Resource Center has everything you need to help your plant grow vibrant and strong. Explore our other articles, visit our online shop, and connect with other houseplant lovers in our Facebook group to learn everything you need to know about this rewarding hobby!


